Thursday, April 25, 2013

Hot Buttered Sole Plate

I was surprised that a quick search didn't turn this up as a commonly used sewing blog title. In preparation for making up more pillowcases, I ran another pass through the serger and hit it with the iron as I normally do with the sewing machine. At first, I thought it was missing stitches, but then it hit me. The "missed stitches" are now glued to the sole plate of my iron.

You should see the other side.

Looking online, I guess I'm not the first to melt this thread so I tested the CTS thread and it was fine. Too bad I went with 1 of each color the last time, instead of just a bunch of black and white cones, so I'll have to order more so I can have groups of 4 matching. In the  meantime, I'll have to pick up more sole plate cleaner and some elbow grease.

Wednesday, April 24, 2013

Mass Production Pillowcases

Finally, I tried out my serger. As it turns out, I just passed the 5 year anniversary of its purchase. Oops! Well, I had bought the basic 1034D to give serging a try and now I have.


I also had a bag of Maxi-Lock thread I had picked up on sale somewhere, a bunch of colors, 4 cones of each. I also looked at CTS USA, where I bought all the thread for the Juki 8700, and it looks like I went with a light thread that is what they also sell for sergers, so I have all those 12,000 yard cones too. To try to learn how to thread this thing, I immediately pulled off the color coded thread spools it came pre-loaded with and read the FM. Only took two tries, and we were in business. It takes regular home sewing machine needles, so I'll have to find a deal on those, since I only have a pile of industrial needles.

Ta-dow!

Now I'll go back to the manuals and video CDs and figure out how to mess with all the settings.

Sunday, April 21, 2013

A Case for Pillows

Today I finally got around to making some pillowcases. Using these instructions I made up some nice french seamed pillowcases (pdf instructions at link under the video).

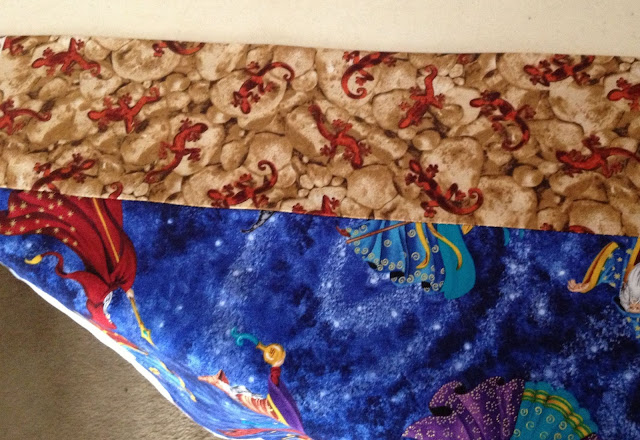
The fabric I have is in the 42/44" range so after pre-shrinking, I used it at its current width and just tore off 10" and 26-1/2"  sections by type. Just line the two pieces up, right-sides together, along one long edge.


Then start rolling up the longer top piece, like this...


And roll the shorter bottom piece up around it to make a tube-ish roll and pin for sewing.


After sewing a 1/2" seam allowance, pull out the fabric as shown in the instructions (I forgot to take a picture each time.)

Unrolled, Shazam!

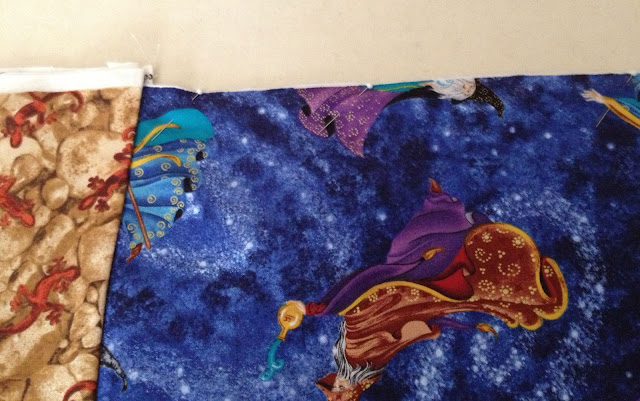
Pin WRONG sides together and sew a 1/4" seam  allowance. Here my lizards fabric is actually a bit wider than the wizards fabric, leaving an overhang. The important thing is just to line things up and sew accordingly. The additional width will be cut off later, so just sew as if it wasn't there. Here, you could actually guide on the edge of the printed section of the lizard fabric, since it overhangs by the width of the selvedge.

Wrong sides together, ready for 1/4" seam

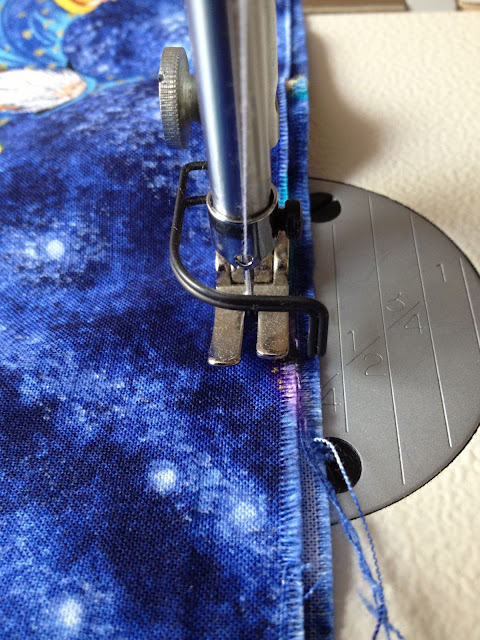
Now, if you look at your layers of fabric, you might have some parts not 100% even (could be not the straightest cut, whatever). To make sure I got everything in the seam, I put the "shorter" side on top for visibility of that edge. But then the 1/4" guide line on the throat plate is covered. However, the side of the presser foot gives you the same guide.


Good pressing is one of the top things you can do to make any sewing project come out really nice, and with these french seams where you sew one way, turn and sew back over to enclose the previous seam, it really helps. I used a combination of a sleeve board and an Ezy-Hem. First I would press over the seams with the help of the sleeve board and then put the thin Ezy-Hem inside to help hold the edge of the turned seam while I pressed it sharp. The Ezy-Hem, being a thin piece of metal, can  really get hot using it for things like this, but I do it anyway. You should be careful in case you're not stupid like me and are more careful with hot metal objects!

This gravity feed iron has what I'm told is supposed to be a guard or heat shield, but damn this thing gets hot after a while too!


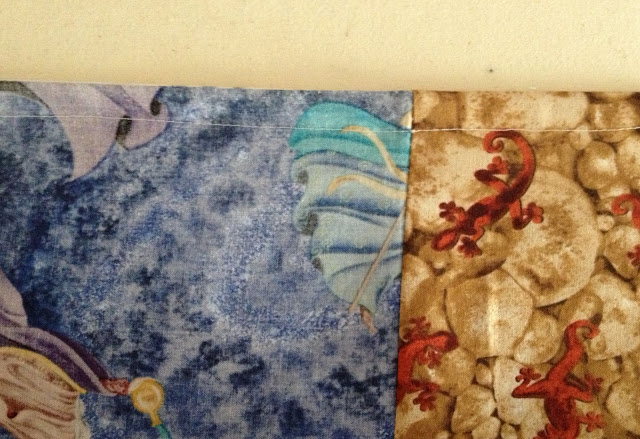
Finished seam is clean like this.

If you're careful about matching your pieces while you sew, you should end up with a nice match like this. This cuff end is the part that really shows any mismatch, so pin and sew carefully when you're sewing the first step of the french seam on the long edge.


This makes a very nice pillowcase, though after making a number of them, I'm reminded that my mother says the other ladies normally serge their pillowcases, like you see on a lot of commercially sold cases. I'm also reminded that I have a serger I've never used, having bought it around the time I realized Susan Khalje had a wonderful plan for my sewing life.. For the time spent, I should probably go for the method that seams, trims and finishes all at once. As an Operations kind of guy, I recognize that unlike my other projects, which have no practical use and can take forever, this is something someone could actually use and should completed in a realistic time frame!


Tuesday, April 16, 2013

Next Episode

While I think on the Akari, I should start thinking about a couple other projects. Or, I should just do one and think about the other. Mother's Day is coming up and I still have this pile of fabric I was supposed to make pillowcases out of for my mother's Shriner's group. They make pillowcases for the hospital and someone's mother realized her son had an industrial sewing machine and 8,000,000 yards of thread. I hope these kids are young enough or not too cool to appreciate that there's wizards on this fabric.

I didn't notice that rhymes
 
I think this is the way it's going to go, with wizards on the main part and lizards on the band. Need to check the yardage and see which one I have more of and proceed accordingly.

For Project #4, I decided to amp up the nerditry. I've had a length of Chanel boucle in the closet for a while. I think it was a remnant from a 2009 or 2010 collection. What would a person making a recreation of Grace Kelly's wedding dress and wizard and lizard pillowcases do with Chanel fabric? What would Susan Khalje do? If she was a geek. She would (pending verification that she had enough fabric) make a version of Misato Katsuragi's jacket. What a great idea!

This comes off as charcoal, though it's more black when I look at it. Just looking at it, I can tell "raveling" may not be adequate to describe what this will be like to work with. I already have a limited amount to work with and it will have to be laid out like a patterned fabric but what might kill this project is if it completely disappears one wooly thread at a time. It might start out cut to fit Lucy and end up sized for an action figure.

Is this the right side?
What are you asking me for?

Back to the drawing board

Having decided to just extend the bottom of the bodice pattern pieces into the skirt/attachment point for the tiers, I decided to redraft the back sections into one piece. This might be wrong, since it doesn't match the picture and probably won't carry over to the Grace Kelly either. Of course, the original separate pieces could be extended also, but we'll see. I probably get closer fitting with the separate pieces too.

While thinking about that, I got to thinking about the real construction of the bodice. This will be lined with steel boning and all that good stuff. I had it vaguely in mind to fold over the top edge as a sort of facing and use that to attach to the lining. But I have the darts at the top edge rather than separate seams as on the average corset. This is in keeping with my previous ruling on how to follow the book on the Grace Kelly. I need to puzzle out how I want to get that top edge folded over and darted and not a bulky mess at those points. For now, I will assume there will be a few muslin samples going in the trash first...

Probably didn't need this

Wednesday, April 10, 2013

Filed under Duh

After I remembered that the Akari is going to be constructed based on the structure of the Grace Kelly, I realized I could just take the bodice piece and extend it down to get something to put the ruffles on. The bottom edge of the piece was already past the wide point of the hips, so there's no shaping necessary for the stuff that is going to just be a place to put ruffles.

It's like a rectangle or something.

Another big sheet of paper traced on later, it hits me that you don't need the top half to draft the bottom section. Hell, you don't even need to draft the bottom section at all! On the plus side, I remembered to construct it like this before I went too far with the separate skirt. It doesn't matter that much on the front, but the back has to replicate the front opening of the underbodice/slip section of the Grace Kelly and it will matter when I start putting that together.

That time of year

All the cherry trees around here just popped. Two days ago, a few bloomed and the next day, pow!, the rest of them.


Tuesday, April 9, 2013

Back On

I saved the ruffled sections from before and went ahead and pinned them back on to think about those attachment locations and widths that I should have made some notes on before. I still think the top tier needs to be wider. Once that is done, then I assume #2 or probably #3 will need some adjustment for my eye. With no legs, I can't say 100% the bottom hem should go, but I'll just pick something and go with that since no one's going to wear it anyway.


Monday, April 8, 2013

Pin Up

The quick look, since the ruffler is a bit of bother to take off, is something like this. Ideally, when this is made up of the real stuff, with boning and whatnot, it will look a lot less wrinkly than pinning up this muslin like this. Really, I could pin and repin and repin to make it look smoother, but this was supposed to get sewn on to the other pieces I traced out again first anyway. But in the meantime, I wanted to see how close it was. I started by pinning the top side seam corners on both sides and then the side seams down. Then I worked the various darts and did some repinning all around to even it out, but close enough. This is kind of why I say I don't care about the seam allowances, just the seam lines, cause they can be lined up on the seam lines on the dress form's cover and fit checked that way.


Pattern Pieces

As a test, I figure I will take some of these parts, make "real"-ish pattern pieces and make up some more muslin samples. (Yes, muslin pieces copied to paper copied back to muslin and sewn together. It makes sense to me anyway.) I already have the front bodice piece and took off the side/back pieces and transferred them to paper.

There's a marudai under there somewhere...

Cut off a piece of paper and then trace the muslin parts and clean up with a square and curves. I'll assume this is the butcher paper from ULINE, since it's either that or freezer paper, and their freezer paper has a poly coating on one side. A roll of this stuff lasts a while. The vertical stand makes it a lot easier to find a convenient spot for it in the house.  This is the 36" roll and stand and while I think it would be cool to have the 48", I don't know how much practical benefit it would be. I'd have to buy a new lamp for that corner.

In the past I've drawn seam allowances around as well, but as long as you realize these are the sewing lines, what's the point? Seam allowance can be whatever.


You can see where this is going. Imagine the darts darted up/

Who left the ruffler on again?


And back to muslin...


Wednesday, April 3, 2013

Butter

I got into the ol' treasure chest looking for pattern pieces again. Here's the 4 ply silk crepe that was bought and ended up being set aside for the Akari.


I found a slip pattern piece for the Grace Kelly that I'll try copying and cutting up for the tier bases. Then I was reminded why I should hang these things and not roll them up. Cheesus Crust it would not stop rolling itself back up! Finally it sort of gave it up and a hole was added so it could go on a hook.

What's that?

Oh yeah, behind one door, there's a roll of silk mikado. Behind this door...

Not from the bridal section
Some day I will think of a project suitable for this treasure!