Showing posts with label Akari. Show all posts

Sunday, January 12, 2014

Fictional Garments


The latest round of vouchers expire at the end of the month, so I have to get back to work and plan what to get with them. I have a general idea what I want to do, but am still sketching and thinking. First pass, it looks like it will have some cross-over with both the Akari dress and the (Not) Chanel Misato jacket. How much that holds up though, I wouldn't want to bet on.

A new line, sort of
A new center front

Something in this direction, but not exactly

Unfortunately a mostly whole bolt of 44" muslin was lost last night when I went to tighten a light bulb and it exploded, throwing glass everywhere. The muslin was standing upright next to the lamp and as I was cleaning a million pieces of glass, I decided to skip not finding all them in the folds of the fabric until... Oh no, only 10 bolts left! Well, Joann's has a 60% off one fabric coupon at the end of the month if I can hold out that long.

Monday, December 16, 2013

Back to the Skirt

Not much today, but I want to get back in the habit of doing "something" every day to try to make some visible progress (eventually). Put the darts into these front and rear skirt pieces and then pinned them on Lucy to think about possible adjustments to the patterns.

Oops, one side should have been folded over along the top edge a bit more and pinned a little lower, but I was distracted by Penguins fighting on TV. I'll mark the guidelines for the "placket" closure before taking these back off.


Got a good match of the various points on this side of the front. That is, the side seam of the skirt matching the side seam of the form, and the darts lining up with each other and the princess seam of the form.


On the other side, you can see that the front piece is overall correct. The side seam matches the side seam of the form with the rest of the waist pinned in place. However, the bodice and skirt darts don't match up. It feels like the skirt dart is closest to the princess seam of the form, while the bodice dart goes a little over to the side seam side of things. The overall bodice piece also matches the form fine, and with the ruffles on, this shouldn't be visible, but I'm sure I'll mess with it again before I'm done for psychological reasons at least.


The length of the skirt section also needs to be determined. With the ruffles going over it, it technically doesn't need to be that long. But even though no one will ever wear it, I'm still going to set it long enough to cover Lucy's backside, if she had one...

Sunday, December 15, 2013

Akari's Back

Today I put the back pieces on the new Akari bodice. Before starting, I realized that I had already put the band on the front. Next time, I imagine I will make the band up in one piece and add it after the sides/backs go on.


The heavy 12" shears are probably overkill, but I still like them for trimming all the layers of the seam allowances. Since the side/back pieces are also underlined, they had enough weight to them to match up okay with the front section, just by folding over and pressing them. The separating zipper was added similar to on the Misato (Not) by Chanel jacket, with the one sided presser foot.


I tried to sew things "tight". That is, to err to the inside of the sewing line. This mostly went well, though I did come up not quite skin tight on the sides. Even though there should be additional bones added to the side and back seams, it still needs to be a touch tighter coming around the sides, given that this is basically a corset.


Next step will be to add the skirt base for the ruffles. I have pieces drawn up based on my best guess as to where on the bodice I want it to sit.

Saturday, December 14, 2013

Akari Returns

Finally I got a chance to get in some sewing today. I've been spending my little free time between shoveling snow and other fun stuff studying Japanese, but I can feel my brain getting full. Maybe tomorrow I'll make a review to be sure I'm really remembering everything.

There was already a pile of pattern pieces on the ironing board based on the next theoretical construction plan. For these, I cut two of each front and side/back pieces and then a band to go along the top. The two each were so they could be sewn up as underlined pieces. Of course, both pieces are just muslin here, but it's the thought that counts.

The underlining test is mainly for the front, since that is the one with all the darts. Ecru thread on unbleached muslin isn't the best for photography, so some of these pictures may stink. Underlining involves basting the two pieces of fabric together and them working them as a single piece. First, the pieces were outlined and then the darts also basted together. I had read competing articles on how to baste the darts together, but what I went with was to baste the two legs.


Despite the thread becoming invisible, it was easy to feel on both sides as I was basting the darts together with the green silk thread.

For this round, I'm going back to my previous theory about making a band along the top edge of the bodice that would then attach to lining pieces on the inside. Based on the bodice pieces, I drew up some pattern pieces for this. The side and center back parts are individual pieces but for the front, I darted this single piece up.


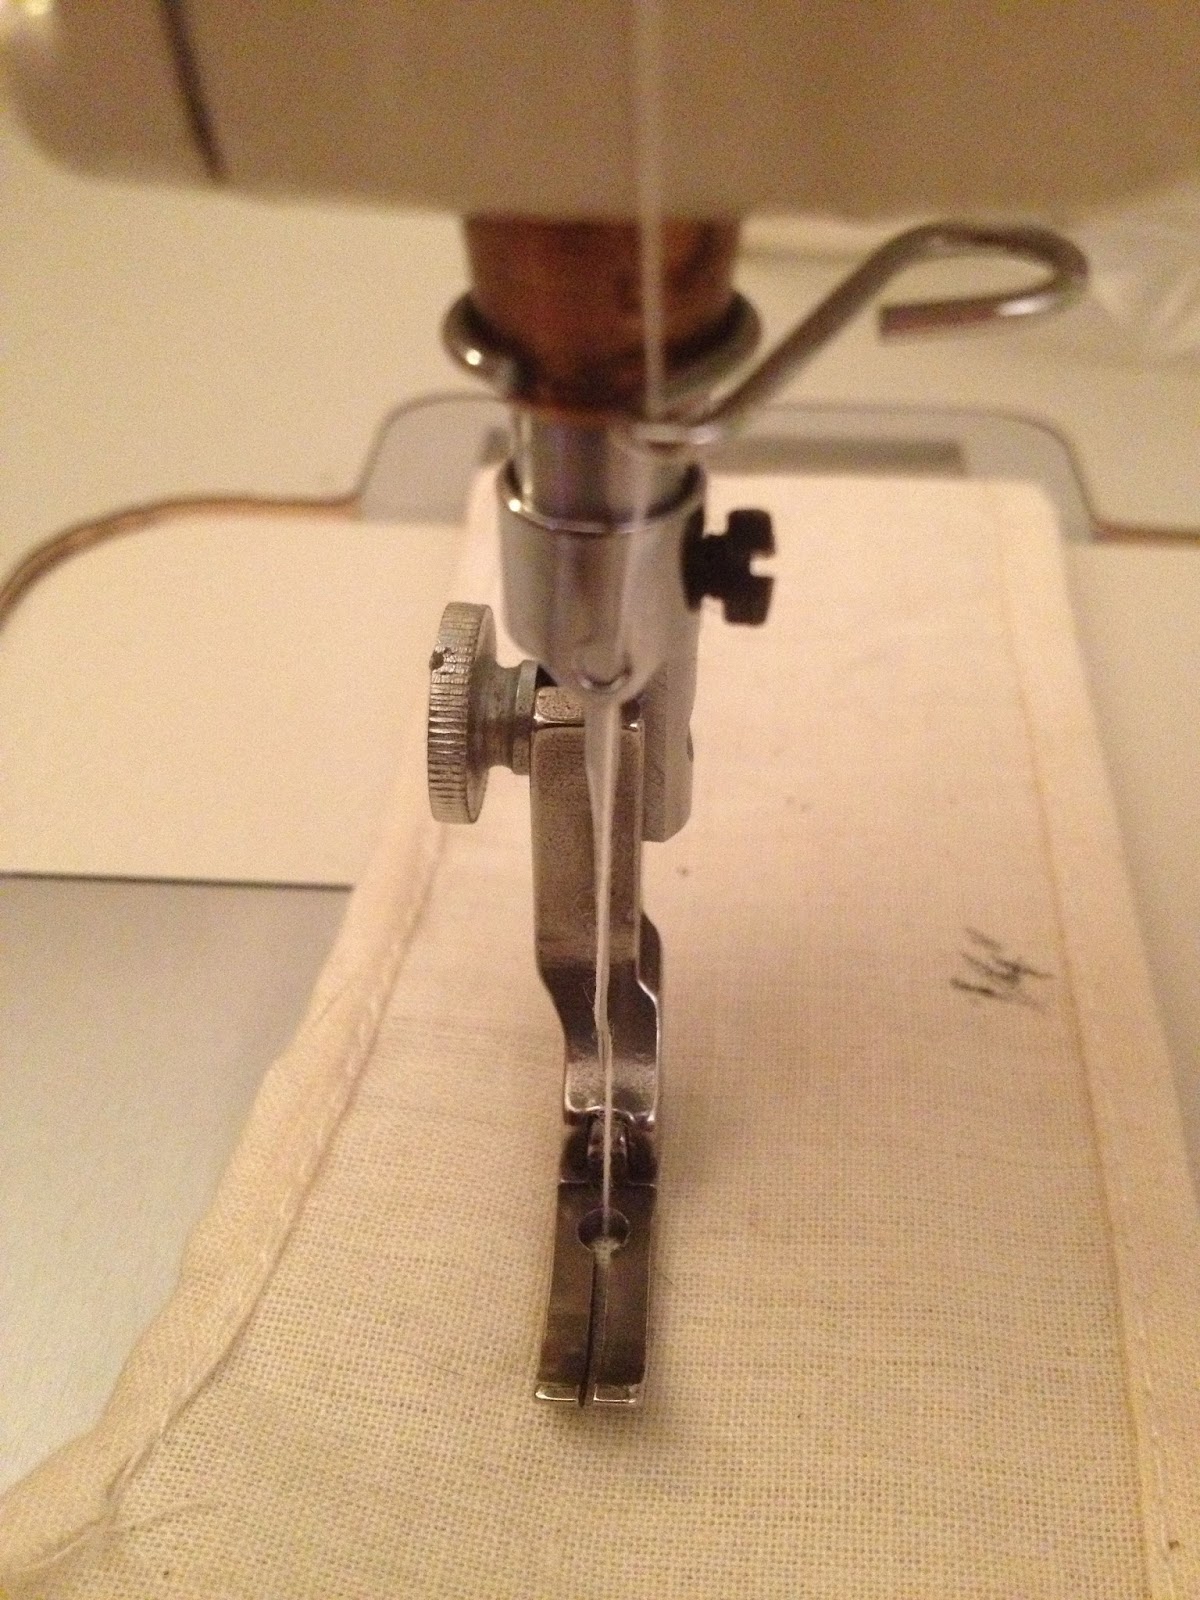
The band piece was basted on with the contrasting silk thread. Thread basting this long waving edge instead of using pins really makes life easier on the sewing machine. The sewing line of course goes back and forth, but also at this point, the pieces are darted which makes them not flat anymore.


Usually I would end up using a lot of pins to keep all the lines lined up and account for the 3D nature of the fabric. Getting them out while steering on the machine ends up being a distraction and you can end up with puckers sewn in or some drunken sewing lines. If you ran off outside of where the sewing line should have been, it's not so bad to go back and resew that section but if you went inside of it, then you get to practice your seam ripper skills.

Once the band was sewn on, the seam allowances were trimmed and clipped. Then the twisting and turning of the ham and seam roll got under way to help press out that edge.


The seam allowances were pressed towards the band. I think this picture is beforehand, but the band was then pick stitched to the underlying seam allowances.


The cased steel bones from a previous test were transferred to the long darts of this front bodice. Because there is an underlining layer, the bones are only stitched to that, so that the stitching doesn't show on the outside of the garment.

Trying the front bodice on Lucy, I found all the points lined up well. With that small triangle shaved off this side of the pattern piece, I finally have it matching all of Lucy's seams.


Up next, I will put on the side back and center back pieces, including a separating zipper for a closure. Also, I have "skirt" sections that will go over the lower portion of the bodice per my previous post about taking this section in more of a Grace Kelly direction. The skirt will be attached to the bodice, and the rear closure will just be an overlap that snaps closed. This piece will end up being the base for the ruffles (maybe).


Sunday, November 3, 2013

Akari Shinohara Meets Grace Kelly

Time again to rethink the Akari dress project following the results of the last test. Reviewing the book (Grace Kelly: Icon of Style to Royal Bride), I noticed a couple things that I think I will incorporate into the next tests. As I mentioned in a previous post, I've been trying to balance making this dress use Grace Kelly dress construction "theory" with Akari dress appearance, making arbitrary decisions about what's "correct". Now I'm going to lean more towards the Grace Kelly construction and the first thing to go is the button closure from the Akari.


Keep in mind that one difference between the Akari and Grace Kelly dresses is that Grace Kelly bodice/underbodice unit opens in front, while the Akari closes in back. The Grace Kelly has a two part front that opens, while my Akari pattern has a single front piece and opens at center back.


This picture got me thinking about the bodice I've been working on for the Akari. So far, it's basically been a corset, but at some point, it was going to have to have something added to the bottom. Since I hadn't decided on how to do the skirts, I hadn't worried too much about it. For the next round, I'll add on the charmeuse slip section.

The slip section might start higher than I was previously thinking. Originally, I was thinking of attaching something at the "hip" line below, but now I'm considering shortening the bodice to the "Mid" line and starting the slip at that point.


Alternately, I might leave the bodice the current length, but attach the slip starting at the Mid line, to give it  more stability on the body. I don't know if it will matter, given the other structural components, like the boning and wide petersham "belt", but will probably keep it hip length.

Looking at this picture, there is a separating zipper for the closure.


While sketching things out, I was wondering how to  put a slip on the bottom of the bodice and have a separating zipper. The solution I think will be as mentioned in the notes (snap closure). The slip section will start above the lowest part of the bodice (and bottom end of the zipper) and the rear seam will have an overlapping, placket type section. That section will have a snap closure which when opened, will allow access to the  zipper. This will allow the rear opening to be large enough to step into, while also being able to have a finished looking closure.

Saturday, September 14, 2013

New Tests

My mother sent some tags for the pillowcases, to say who they were made by (the group, not me), but they turned up a little smaller than expected, so I had to think about how to insert them. Originally I thought these would just have one end in the seam as it was sewn. The actual tags are a little small with small enough borders, that I don't feel confident about that. Plus, I'm not sure the ends are meant to be left completely unstitched. I didn't want them to unravel down the line.

Rather than make my mother try to attach them by hand later, I'm looking at ways to attach them by machine while in production of the pillowcase itself. I decided to center it inside the band. The band is ripped to length, and folded in half on the long edge, in preparation for attaching to the body of the pillowcase. Once that center line is established, I just center the tag on one side of the band and sew down the ends.

Back to the bag of feet for a narrow presser foot so I can see what I'm saying.


Threads are pulled to the back and tied off and when the pillowcase is finished, it looks like this. I made sure to pay attention to how the band went on to make sure the tag didn't end up on the outside.


I also cut out another pile of pattern pieces for the next Akari test.


Since this was to be a test of the new pattern pieces for the back closure, I ended up doing a test of the test. From my left over pieces of muslin, I ripped up four new pieces, two a little wider than the other two to represent the outer and inner layers planned for this construction. The sections were sewn together at the ends to make two units, and then pinned together with an idea to sew them together along the top edge to connect them.


If these two were the same width, this wouldn't be a big deal, but here one layer is wider, since the center back sections are wider on the outer unit to form the overlap pictured in the manga drawing.

I didn't even sew it, but folded over, you can get an idea how this isn't working.


One of these edges is going to get turned in an unfinished looking ugly way. After thinking through a number of ways of stitching this that didn't work., I came up with the idea below.


In this plan, the center back (CB) sections are finished before the side back/front sections are sewn together along the top edge. This should get the two units connected a good ways around the body, but leave the center back sections separate from each other. That should make the fake closure look that much better, but as always, I'm on standby for this plan to not work exactly as expected.

Tuesday, September 3, 2013

Akari's Wedding Dress

It's been a while since I worked on the Akari dress, so I tried to make a little progress over the long weekend. I kept going back and forth on how the back is going to come together, so I started with the front.


After re-reading my notes on the Grace Kelly dress, that this is supposed to be an R&D project for, I ended up coming up with a four layer test plan. The four layers will actually be two layers. One, an outer layer made up of four-ply silk underlined with a fabric to be named later. Two, an inner layer made up of two layers of cotton.

The outer layer will have a phony closure made up to resemble the drawing of Akari in the manga. The inner layer will have a separating zipper to reflect, more or less, the underbodice unit of the Grace Kelly dress.

For the center back, I started working over the pattern pieces to account for the phony closure. That part will be 2" wide, centered on the center back. To modify the pattern pieces, I had to draw in the closure. On both the right and left center back pieces, I drew lines parallel to the center back line, 1" over in each direction.


On the left side, this should become two pieces as noted above. There's a good chance of this become several pieces, so the "closure" becomes a separate flap. The right side will be extended in width, but I'm not sure if this will make it look more like it's two sides, buttoning up as-if it were a real closure or screw it up because it will look like things don't line up. I need to draw it out on paper some more.

Okay, I thought about it again and that flap idea was wrong. The overlap version is the correct one.


Sunday, July 28, 2013

Fun With Irons

While waiting for this pot roast to slow cook, I spent the day sewing up new test garments. A new sleeve draft was made, based on the basic dartless sleeve. Pretty much just straight down from the end points of the shoulder, but I did taper it a bit thinking that looked really wide. I also redid the collar pattern, to be longer and taller.The back was also redrawn as one piece.


The first thing I did was to burn my arm with the iron. Right where my pincushion goes, so that was inconvenient. And then I absentmindedly scratched it. Once...

First, I worked up the Akari bodice. Twice, really, so I could have the inside and outside. It took a while, but with enough pins, it wasn't too difficult.


I had a hell of time pressing it after this point, but eventually got it on Lucy.


Once again, I realized I need to shave off some of this one corner. Last time, I wasn't sure if it was the pattern or just sewn that way, but I'll tighten it up next time.


The back worked out well enough. I need to narrow a section or two just a bit, though once again, I'm not sure if it's the pattern piece or just sewn a little large. I'll probably narrow it just a bit and keep watching the sewing. With this kind of fit, a little difference stands out a lot more.


I have to adjust the center back pieces for the actual closure anyway, but things are lining up close enough to Lucy's guide lines to consider this a nice improvement.

I got the Misato jacket together similar to the previous trial. That is, sew the body of the jacket together then slide on the sleeves and pin on the collar. I folded some edges under and left a "seam allowance" on the collar so it could be pinned below the collar line, under the jacket. I thought this would make it sit a little more like it would if it were sewn on. I guess it worked, but on the next test, I think I will sew it all up and also see if the sleeves really are heading in the right direction.

Getting dressed
I think I went a little too long on the collar, since it should reach just to the edge of the front piece rather than to the opposite shoulder seam. I do think I like the extra height on the collar though.


For the back, right now I'm going with this one piece back and will make the center "stripe" just a bolt on. I was thinking about making it three pieces, but I couldn't think of a good reason to do that.


The center piece will probably just be a strip with edges folded over and sewn with one of these feet. These should keep the edgestitching on track.


As it turns out, the answer to the question, how many times can I drop my iron on the floor today before the water starts coming out of places water isn't supposed to come out of? is two. I'm sure there's a gravity feed iron joke in here somewhere, but I'll think it up later after I order a new one.

Thursday, July 25, 2013

The End of the Roll

I've been meaning to make a new bodice test on the Akari with the new pattern pieces and finally I got around to cutting the parts out.


This time, I made sure to cut two pieces each for the whole way round. Of course, this time I have left and right back specific pattern pieces, so it was easier to remember.

And I found this! This is what the center of a bolt of fabric looks like!

Yeah, I know how "interesting" this actually is...

Monday, July 1, 2013

Even More Bodice

I redraped the back bodice pieces, to try to make the lower sections more accurate. We'll see how that turned out when the next test bodice gets made. This time, I did both sides of the back which should make the pattern pieces fit a little better than the old "cut 2", at least after I make whatever adjustments are sure to be needed.

Holiday weekend coming


I dug up these buttons for the Grace Kelly, but I don't think the color will quite work for the Akari. No big deal, since I seem to only have bought a minimum number of these and will have to get more anyway. The buttons will be for the fake button closure on the back, which will somehow conceal a zipper, in keeping with the theory that this is a test garment for the Grace Kelly Project.


Tuesday, June 25, 2013

A Little Hand Sewing

I put the boning pieces in today, using catch stitches. They were attached at the side seam allowances and the front long darts as well as one just to center front. These should be stitched to the underlining, but since the test bodice wasn't made with underlining, I just tried to  keep the bite to the outer fabric to a minimum. I didn't try it on Lucy yet, but I think I will make more up for the other locations that will get boning (generally the same locations, but below the waist line and then  to the back too).


Monday, June 24, 2013

Boning

The skirt pattern pieces were transferred to paper, to keep a good copy for future use. I made some minor adjustments based on the fit of the muslins and will come back to them later.

To continue work on the bodice, I got the spiral steel and bolt cutters out again and started making pieces up for testing. I measured the form from the waist up, deciding on 4" sections for each side seam and center front, and 3" sections for along the vertical darts/princess lines. Technically, I should have made more pieces for below the waist and around the back, but I didn't want to use up my limited supply of boning materials before I made an actual test.


Bones need casings and per Grace Kelly, they should be made of ribbon, but the only ribbon I have is that wide green stuff from the ruffle testing. WWSKD? I consulted the old episode of Sew Much More that will forever live on my Tivo and went with these muslin casings for now. I folded over one end and pressed it. A line of stitching was run 1/4" in from the folded edge. This leaves an edge section for sewing into the garment. Another line was sewn 1/2" over from the first.

There's stitching there, really.
The piece of muslin I ripped off had a width that allowed me to get two bones in each channel, so I marked the inside ends and sewed them off. Then, I put the steel pieces in and sewed the ends closed.


I probably would have pinked these, even if Susan hadn't told me to.


Tomorrow I should get a chance to sew these in to the bodice. I need to review the video tape to see on what layer they should be sewn. The test bodice has an outer layer and an inner layer, but the inner layer represents a lining layer and the outer layer doesn't have an underlining layer. That's probably where they would go, but for testing purposes, I think the inside of the outer layer will be okay, since it's not like it's going to matter if you can see them through the muslin.

Sunday, June 23, 2013

More Skirt

It occurred to me that I could work on the fit of the skirt by making a front and a back piece, just sewing the darts and then pinning them on and revising the side seams, as needed. This got me thinking about thinking about right versus wrong side. I traced off the pieces and sewed the darts on the right side. When I went to sew them, I just folded and worked on the side where the lines were drawn, for ease of working. Then, after pressing them, I started pinning them on with the darts to the inside of the pieces. Because I'm matching these to the princess lines on the form, and because the form isn't 100% symmetrical, for a second I thought I had really misplaced them. Once the pieces were flipped so the "right side" was out, it was very close, and within the realm of "operator error".

To get the test skirt on Lucy, I used the collapsable shoulder feature. If you push in her arm sockets, there's a mechanism inside that will hold the shoulders in until you push them again, which causes them to pop back out.


But... tight fitting skirt plus dress form with other things on top equals this still doesn't work.


The back will likely become two pieces with a zipper anyway, so let's make a cut in that area.


Now that it was on, I sez to myself, Self, you want to try it with the new bodice piece on too. Back off and on one more time, and note to self, need a little more room in the skirt if you're going to have stuff under it. Good enough for today though!


The next step will be to make an adjustment or two to the skirt pattern and then try making it up as an outer layer and lining layer. Also, the ruffler is going back on to test some new ideas. Pictures to follow if any of them turn out to to be good ideas.